How to Make a Memory Blanket Out of T-shirts Easily
Oct 05, 2022
Are you interested in learning how to make a memory blanket out of t-shirts easily? Then, we’ve got the perfect planned step-by-step guide for you!
Making a memory blanket with your child’s clothes can preserve cherishable moments like life milestones ---marathons, band performances, sports events, and more. Or, you can use a memory blanket as a way to memorialize a lost loved one after they pass - keeping them with you in spirit each and every day.
In this article, we’ll show you exactly how to make a t-shirt memory blanket with step-by-step instructions. Let’s get started!
What Exactly is a Memory Blanket?
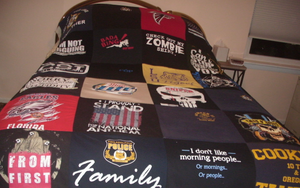
Sometimes referred to as a remembrance quilt, a memory blanket or quilt is a dedicated compilation of fabrics meant to cherish and preserve memories. Memory blankets are often created to preserve the memories of a lost loved one or celebrate a milestone or event like school graduation. Typically, you’ll use t-shirts. However, you can sometimes you use jerseys, hoodies, and other garments, too.
Why Should You Learn How to Make a Memory Blanket Out of T-shirts?
Learning how to make a memory blanket out of t-shirts is a fun and unique skill to master. This is one of the best ways to preserve memories forever - through old t-shirts that would otherwise be thrown out or donated. These make for exceptional gifts as well..
This skill can be incredibly time-consuming but worthwhile. That’s because you’ll save a bit off money from having to send your quilt in to the profesisonlas. Read our post on how much it costs to make t-shirt quilts for more information.
For many people, learning how to make a memory blanket from scratch may be too time-consuming. For others, it’s the perfect task to spend free time while making a cherishable memory quilt. The Keep in mind, though, that making a memory blanket can be quite difficult if you don’t have sewing skills already. Moreover, this task can be time-consuming - which is why many end up sticking with a professional service on this project after all.
While we will provide you with your next steps for making a remembrance quilt below, we also are here to help bring your blanket to life with ease. Project Repat is the #1 choice online for where to get t-shirt quilts made. We’re here to help those who don’t have the time, energy, or refined skill to make memory blankets themselves---let us do the work for you at an affordable cost!
How to Make a Memory Blanket Out of T-shirts: Step-by-Step Guide
If you decide that you do want to learn how to make a memory blanket out of t-shirts, you’re in luck. By following this step-by-step guide, you’ll be well on your way! First things first - how big do you want the blanket to be?
Step 1: Figure Out Your Desired Size For Your Memory Blanket
Before you start creating your memory blanket out of t-shirts, you need first to figure out the desired size of your blanket. For example, do you want a queen-size or lap-size memory blanket?
Follow this guideline for the number of shirts needed:
|
Blanket Size |
# Of Shirts |
|
Lap |
16 |
|
Twin |
24 |
|
Full |
30 |
|
Queen |
49 |
|
King |
64 |
For more information on sizing, go to our post answering how many shirts are needed for a quilt!
Step 2: Cut Out The T-Shirt Squares
Once you’ve figured out the desired size of your memory blanket, it’s time to cut out the t-shirt squares.
For this task, you’ll need a rotary cutter and a mat. These tools will speed up the process, but if you don’t have a rotary cutter, you can utilize fabric scissors instead.
While cutting out the t-shirt squares, ensure each fabric square is the same size. We recommend cutting the t-shirts into 12" x 12" or 14" x 14" squares. This creates a more uniform look, but if you’re looking for a more rustic, customizable appeal, you can mix up the sizes of your squares. It’s important to note that choosing this method will be difficult to sew the squares together evenly.
Make sure to tidy up the edges of your t-shirt squares, so there is no loose fabric or strings before moving on to the next step.
Step 3: Arrange The T-Shirt Squares Into Your Preferred Design
Now that the fabric has been cut up into evenly sized t-shirt squares, it’s time to set up the squares into your preferred design for your memory blanket.
We encourage you to ensure you’re pleased with the design before beginning the next step. For ideas, check out our article on the best t-shirt quilt ideas, including patterns and styles to inspire your work of art!
Step 4: Sew The T-Shirt Squares Together
It’s time to sew it all together!
For this step, it’s up to you how you want to sew them together, but we encourage you to ensure that the seams are straight and tidy. A ½” seam is recommended as well as using sewing pins to hold the pieces of fabric together. To do this, ensure that the outside of the blanket faces each other and that the pins are on the back of the quilt. Once you’re finished pinning the fabric, use a needle and thread to tack the pieces together.
This process should layer down each row of t-shirts so that you have four long strips pinned together. After finishing a row, set it aside and complete the next row. Once the four long strips are completed, grab an iron and press the seams to make them flat on the blanket's reverse side. Then, pin two long strips together to tack them in place. Then, sew the strips again while leaving a ½-inch allowance. This process should be repeated to conjoin the other strips and iron the back of the seams.
If you’re new to sewing, we highly recommend scouring YouTube for beginner-friendly sewing tutorials that can guide you through this process.
Step 5: Time To Add The Batting & Backing
Now that all the t-shirt squares have been sewn together, it’s time to add the backing and binding. There are different choices for backing, so we recommend giving our post on the best backing for a t-shirt quilt a read before you start!
For this part, we want to ensure that everything is tight so that there is no loose fabric or wrinkles in your blanket.
If you use a rotary cutter, cut the batting and backing to size before attaching them to your blanket top. If you don’t have a rotary cutter, you can cut your batting and backing after attaching them to your blanket top.
Once the batting and backing have been cut to size, attach them to the blanket top. We highly recommend using a spray adhesive and following the instructions on the package.
Step 6: It’s Time To Add The Binding
You’re at the last step for making your t-shirt memory blanket!
We encourage you to take your time for this step, as this part can be difficult. As always, we recommend following along or watching beginner binding tutorials on YouTube if you’re a beginner and need more instruction.
Cut the binding into strips twice as wide as your desired border. Then, fold the binding in half. Iron it, creating a crease in the middle. Once completed, position the binding over the blanket's edges and fold it at the corners. Next, pin the binding in place, then sew it to the blanket's edges.
For a neat finish, leave a ¼-inch seam allowance at the edges.
Remove all pins and trim excess threads or fabric once finished. Great job, you have yourself a memory blanket!
Step 7: Wash It Before Using Your T-Shirt Memory Blanket
This next step is highly recommended as it will help preserve the colors of the t-shirts and the fabric of your memory blanket.
To prevent damaging your new memory blanket, wash the memory blanket on a gentle cycle with cold water. Then, enjoy your new memory blanket!
If you have any questions on the process, check out our other post on how to make a t-shirt quilt DIY for beginners!
Want to Get a Stunning, Long-Lasting Memory Blanket Without the Work?
Did reading the step-by-step instructions on how to make a t-shirt memory blanket overwhelm you? Then, Project Repat is your next best option!
As the #1 online t-shirt quilt company, Project Repat promotes affordable and high-quality services. Creating memory quilts made from shirts, our established company has pleased millions of customers worldwide and achieved exemplary ratings and reviews with our top-notch products and services.
Final Thoughts on How to Make a Memory Quilt
Creating a memory quilt from scratch can be worthwhile. Still, if you’re a beginner or don’t have the time and energy to commit, investing your money in a professional company that can do it for you may be best. That’s where Project Repat swoops in to save the day with our affordable and top-notch services.
Save yourself time, money, and energy making a memory blanket by investing your trust in Project Repat, where our customers are guaranteed excellent results with their memory blankets!