How to Make a T-Shirt Quilt DIY for Beginners
Jun 06, 2022
If you're looking to learn how to make a t-shirt quilt easy, you've come to the right place. Today, we're going to guide you through the entire process from start to finish. By the end of this detailed guide on how to make a t-shirt quilt for beginners, you'll feel confident in taking the next step to get started.
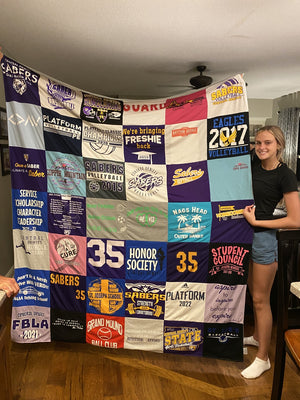
Project Repat is the most trusted source for all your custom t-shirt quilt needs. We were the first to do it, and we're still here today producing fabulous quilts from your old t-shirts that you send us. Ultimately, there is no easier way to get a stunning quilt you're proud to show off than by partnering here with us. However, if you're looking for a fun DIY weekend project, bringing your quilt to life is entirely possible on your own. It just takes some basic skills, a few essential supplies, and a strong work ethic!
In this guide, you'll learn the pros and cons of making your own DIY t-shirt quilt vs having one commissioned here at Project Repat. Then, we'll explain what supplies you need to actually make your own t-shirt quilt. Of course, we'll walk you through each step to bring your vision of your dream quilt to life. As you can see, we've got a lot to cover. And, we know you're excited to get started on this project. So, let's not waste any more time. Here's how to make a t-shirt quilt easy.
Can You Really Make Your Own T-shirt Quilts DIY?
First things first - is it really possible to learn how to make your own t-shirt quilts DIY? The answer is yes! With some time, patience, and effort, you can absolutely make a beautiful quilt from the comfort of your own home. However, we will say that it's not always easy. Making a quilt takes a lot of work. In fact, it's often seen as more of an art form than just a simple sewing project. As such, it is imperative that you set your expectations from the start.
If you're someone who loves DIY projects and isn't afraid of a little hard work, then making your own t-shirt quilt is definitely feasible. On the other hand, maybe you're someone who prefers to leave complex projects to the professionals so you can spend time relaxing on the weekends or working on other projects at home. If so, then we would recommend commissioning one of our experts here at Project Repat to create your dream quilt for you. And, as we explained in our guide covering how much t-shirts quilts cost, it's very affordable. It's really up to you and what you're looking for in the end.
We know what you're probably thinking...how hard can it be to make a t-shirt quilt DIY? We'll do our best to break it down so you know what to expect...
Is Learning How to Make a T-shirt Quilt Hard?
This is a tough question to answer because there are a few factors affecting how difficult it will be to bring your t-shirt quilt to life. For one, it depends on your level of experience with sewing and crafting. But you should also be realistic with yourself as to how much time you're willing to dedicate to this project.
If you've never sewn before, then learning how to make a t-shirt quilt will definitely be harder for you than someone who has some experience under their belt. However, that doesn't mean it's impossible. With enough time and practice, anyone can learn how to sew a t-shirt quilt - it just might take some extra effort on your part. On the other hand, if you're someone with some sewing experience, then you'll likely find the process to be much easier.
Furthermore, how complex you want your t-shirt quilt to be will also affect how difficult it is to make. If you're planning on making a simple quilt with just a few different fabrics, then it won't be as challenging as if you're trying to create an intricate design with multiple colors and patterns.
Now that you have a better understanding of what you can expect from this fun little t-shirt quilt DIY project, ask yourself these questions:
- would you rather spend the weekend (or longer) trying to hone your sewing skills, or leave it to the professionals so you can kick back and relax in your limited free time?
- Are you going to be happy with a quilt that leaves a bit to be desired in terms of appearance and comfort, or do you want the best of the best - something you're proud to show off?
The answers to these questions will help you determine if you're really up for the task or not. And, if you're still feeling like you want to commit to this, good on you! Let's talk about what you'll need to bring your t-shirt quilt to life.
What You Need to Make a T-shirt Quilt DIY
Assuming you've decided to go ahead with this t-shirt quilt DIY project, there are a few things you'll need before getting started:
- A sewing machine (or access to one)
- A rotary cutter and mat (optional but recommended)
- Fabric scissors
- T-shirts (of course!)
- Quilt batting
- Quilt backing fabric
- Coordinating thread
These are the basic supplies you'll want to have on hand before starting the project. And, chances are, you're wondering...how much of all this do you need exactly? How many t-shirts to make a quilt are necessary? How much batting should you buy? The answer is....it depends! As we discussed in your blog post (linked above), there are quite a few different size quilts you can make. A large queen-sized quilt needs at least 20 shirts - whereas a small lap-sized quilt requires just 6-8 shirts. Consider your vision for the quilt and secure your supplies accordingly.
Now that you know what materials you'll need, it's time to start thinking about the process. Here's a step-by-step guide on how to make a t-shirt quilt for beginners...
How to Make a T-shirt Quilt for Beginners: Step by Step Guide
Making your own t-shirt quilt DIY is a fun and rewarding process - but it's also one that requires time, patience, and practice. If you're a beginner, don't get discouraged if your first attempt isn't perfect. Just like with anything else in life, the more you do it, the better you'll become at it. And trust us, the end result will be worth all of your hard work. Having made it yourself, you'll feel a sense of accomplishment regardless of the final product.
To help make things as easy as possible (and to ensure you have the best experience possible), we've put together a step-by-step guide on how to make a t-shirt quilt for beginners. Just follow these simple steps and you'll be well on your way to creating a beautiful DIY t-shirt quilt...
Step One: Cut Out Your T-Shirt Squares
The first step is to cut out your t-shirt squares. You'll want to use a rotary cutter and mat for this part - as it will make the process much easier (and faster). If you don't have access to a rotary cutter, no worries. You can always use fabric scissors instead. Just know that it might take you a bit longer to get all of your pieces cut out.
When cutting out your t-shirt squares, you'll want to make sure they're all the same size. We recommend cutting them into 12" x 12" or 14" x 14" squares. This will ensure that your quilt looks nice and uniform when it's finished. Of course, if you're going for a more rustic look, feel free to mix and match the sizes of your squares. Just know that it might be more difficult to sew everything together evenly.
Before proceeding to step two, ensure you’ve tidied up the edges on your squares with a pair of scissors so they look nice and clean. Ensure all your t-shirt squares are exactly the same shape and size.
Step Two: Arrange Your T-Shirt Squares
Once you have all of your t-shirt squares cut out, it's time to start arranging them on your quilt top. This is where you'll get to be creative and have some fun! There are no rules when it comes to arranging your t-shirt squares. You can do it however you want - just make sure you're happy with the final result before you start sewing.
If you're having trouble deciding how to arrange your squares, we recommend playing around with different layouts until you find one you like. You can also use a quilt template to help you get started. Once you have your layout finalized, it's time to start sewing...
Step Three: Sew Your T-Shirt Squares Together
The next step is to sew your t-shirt squares together. Again, there are no hard and fast rules here. You can sew them together however you want - just make sure all of your seams are nice and straight. We recommend using a ½" seam allowance for this part. If you're new to sewing, don't worry! There are plenty of resources out there to help you get started. YouTube is a great place to find beginner-friendly sewing tutorials. Just do a quick search and you'll find tons of helpful videos.
To make life a bit easier, use a sewing pin to hold all the pieces together. Make sure to put the outside of the quilt facing each other (the pins need to go on the back of the quilt). After pinning, you can use a needle and thread to tack the pieces together.
Work your way through each of the rows of t-shirts you pinned together so you have 4 long strips. Once you've finished a row, set it aside and move on to the next row. When you have created 4 long strips, use an iron to press the seams, so that they lay flat on the reverse side of the quilt. Pin the 2 of the long strips together and tack them in place. Sew the strips again leaving a 1⁄2 inch or 13 mm seam allowance. Repeat this possess to join the other strips together and iron the back of the seams.
Once you have all of your t-shirt squares sewn together, congrats! You're one step closer to finishing your quilt. Now it's time to add the batting and backing...
Step Four: Add the Batting and Backing
The next step is to add the batting and backing to your quilt. Again, there are a few different ways you can do this. The most important thing is to make sure everything is nice and tight. You don't want any loose fabric or wrinkles in your quilt.
If you're using a rotary cutter, we recommend cutting your batting and backing to size before attaching them to your quilt top. This will make things much easier (and less messy). If you're not using a rotary cutter, no worries! You can always cut your batting and backing after you've attached them to your quilt top.
Once you have your batting and backing cut to size, it's time to attach them to your quilt top. We recommend using a spray adhesive for this part. Just make sure you follow the directions on the package carefully. Once everything is attached, congrats! You're one step closer to finishing your quilt.
The final step is to add the binding...
Step Five: Add the Binding
The last step is to add the binding to your quilt. This part can be a bit tricky, so we recommend taking your time and being extra careful. If you're new to quilting, we recommend watching a few binding tutorials on YouTube before getting started.
Cut your binding into strips that are twice as wide as the border you want to create. Fold the binding in half and iron it to create a crease in the middle. Then place the binding over the edges of the quilt, folding at the corners. Pin the binding in place before sewing it to the edges of the quilt. For a neat finish, leave a 1/4 inch (6.4 mm) seam allowance around the edges.
Remove any pins, and trim any excess threads and you’re done! You've officially finished your quilt. Now it's time to wash it and enjoy!
Washing Your Quilt Before Using it
We know we said step five was the final step...and technically, it is. You've finished making your t-shirt quilt. However, before you use your quilt or put it on display, you need to wash it. We recommend washing it on a gentle cycle with cold water. This will help preserve the colors of your t-shirts and keep your quilt looking its best.
Once your quilt is washed, congrats! You did it! You've officially made your very own t-shirt quilt. We hope you enjoy it for years to come. And the next time you can't think of a gift idea for family members or close friends, you now have a fun, unique idea to fall back on - just go steal a drawer of their favorite shirts!
Save Time & Energy While Getting a Beautiful, High-Quality T-shirt Quilt at Project Repat!
We said it before, and we'll say it again. Making your own DIY t-shirt quilt isn't for everyone. You've learned how to make a t-shirt quilt relatively easily...but if you're still not quite sold on the process, we've got you covered. You can send your shirts to us and we'll send you back a stunning quilt - it couldn't be any easier. It's simple and affordable - with quilts starting at just $75. And the final product is a work of art - our reviews speak for themselves!
There's a reason we've come to be known as the most trusted source for those looking to make a t-shirt quilt. Get the process started today and see the difference for yourself - you won't regret it!
Closing Thoughts on How to Make a T-shirt Quilt for Beginners (DIY)
Well, there you have it. We've explained how to make a t-shirt quilt for beginners. Hopefully, this guide has helped you gain clarity on what your next steps should be. If you're up for a fun challenge, you now know the steps necessary to bring your DIY t-shirt quilt to life. Or, if you're not quite sure this is the right project for you, and you want to leave it to the trusted experts here at Project Repat, that's ok too! Best of luck - and we hope to hear from you soon!